Scania R2 630 Longline Zweden Uitvoering
Scania R630 Longline Sweden Style
Het Project
The Project
Voor dit project heb ik destijds in 2014 de Scania Imperial van Italeri aangeschaft. Later gedurende het bouwproces op het idee gekomen om er een longline van te gaan bouwen en toen, van KFS uit Engeland, de Longline cabine TQ-63 Conversion kit aangeschaft.
For this project, I purchased the Scania Imperial from Italeri back in 2014. Later, during the construction process, I came up with the idea of converting it into a Longline, so I purchased the Longline Cab TQ-63 Conversion kit from KFS in England.


Bouw Proces Trekker; Deel 1
Building Proces Truck; Part 1
Hieronder vind je het verslag van het bouw proces tot 12 Augustus 2025 waarin je de vorderingen die ik tot op dat moment gemaakt heb kunt bekijken.
Below you'll find the report of the construction process up to August 12, 2025, where you can see the progress I've made up to that point.
Bouw Proces Chassis 2014
Building Proces Chassis 2014
Dit project is dus begonnen in 2014, op de eerste foto’s zijn van wat ik toen gebouwd heb qua chassis. De bedoeling was om er een 6x2 sleper te bouwen.
Ik ben toen begonnen met het chassis en de voorbumper. Het chassis omgebouwd naar een 6x2 door deze te verlengen en er een extra achteras onder te zetten. Het chassis toen nog een keer onderhanden genomen omdat de brandstoftank, reservewiel en AdBleu tank niet pasten. Hierdoor het chassis voor het tandemstel doormidden gezaagd en met zo'n 2cm verlengt.
De voorbumper ben ik gaan aanpassen, dit om de bumper meer correct te krijgen. Zoals Italeri hem gemaakt had (en nu nog steeds doet) licht de bumper te dicht aan de grond. Dit komt omdat ze de bovenste opstap te groot gemaakt hebben. Dus dit het ik toen aangepast zoals je op de onderstaande foto's kunt zien.
This project began in 2014. The first photos show the chassis I built back then. The plan was to build a 6x2 tag axle.
I did start with the chassis and front bumper. I converted the chassis to a 6x2 by extending it and adding an extra rear axle. I then reworked the chassis because I couldn't fit the fuel tank, spare tire, and AdBlue tank. This meant sawing the chassis in half infront of the tandem axles and extending it by about 2 cm.
I modified the front bumper to get a more correct fit. The way Italeri built it (and still does), the bumper sits to close to the ground. This is because they made the top step too large. So I modified this, as you can see in the photos below.


Bouw Proces Chassis 2015
Building Proces Chassis 2015
Nadat het project meer dan een jaar stil gelegen en ben ik er in November 2015 weer mee begonnen met het idee om van dit model een Longline te gaan bouwen.
Hiervoor toen bij KFS de Longline Conversion-Kit gekocht met een CNC gesneden achterkant van een Scania chassis.
Ik heb toen het CNC gesneden achterchassis gebruik met, voor de sleepas, een Resin as ophanging van KFS.
Beide assen zijn toen aangepast, dit door een verstevigings beugel tussen beide veerpoten, verder de luchtvering aan te passen zodat de sleepas in gelifte positie kwam te staan.
Verder de meegegoten bouten verwijderd en op die plekken MENG bouten gelijmd voor een meer realistischere uitstraling.
Ben nooit echt tevreden geweest met het chassis en dat was één van de redenen dat hij op de plank beland is.
After the project was on hold for over a year, and in November 2015, I restarted it with the idea of building a Longline model from this model.
I bought the Longline Conversion Kit from KFS for this, which included a CNC-cut rear end from a Scania chassis.
Then I used the CNC-cut rear chassis with a resin axle suspension from KFS Model for the tag axle. Both axles were then modified by adding a reinforcement bracket between the two struts and adjusting the air suspension so that the tag axle was in a raised position.
I also removed the cast-in bolts and glued MENG bolts in those spots for a more realistic look.
I was never really satisfied with the chassis, which was one of the reasons it ended up on the shelf.


Een ander idee die ik in 2015 had, was om de gril open en dicht te kunnen doen. Hiervoor diverse aanpassingen aan de gril gedaan zodat de gril in de bumper en van de cabine scharnierend gemaakt konden worden.
Ook dit was een reden dat het project op de plank terecht is gekomen omdat het mij niet wauw lukken doordat ik niet precies wist hoe ik het moet aanpakken.
Another idea I had in 2015 was to be able to open and close the grille. I made several modifications to the grille to make it hinged in the bumper and the cab.
This was another reason the project was shelved, as I couldn't quite manage it at the time because I no idee how to approach it.


Bouw Proces Chassis 2025
Building Proces Chassis 2025
Nu, na Tien jaar op de plank gelegen te hebben, het project in Juni 2025 er weer vanaf gehaald.
Ik heb het chassis door midden gezaagd en het CNC gedeelte er af gehaald omdat het mij niet sinde. Het CNC deel heb ik vervangen door een KFS Resin achterchassis die ik nog had liggen incl. de ophanging met luchtvering voor beide assen. Deze past beter en het lijkt nu ook stukken beter.
De luchtbalgen heb ik door gezaagd en die van de trekas heb ik met 2mm vergroot en die van de sleepas met 2mm verkleind.
Hierdoor krijg het mooie effect van een gelifte sleepas.
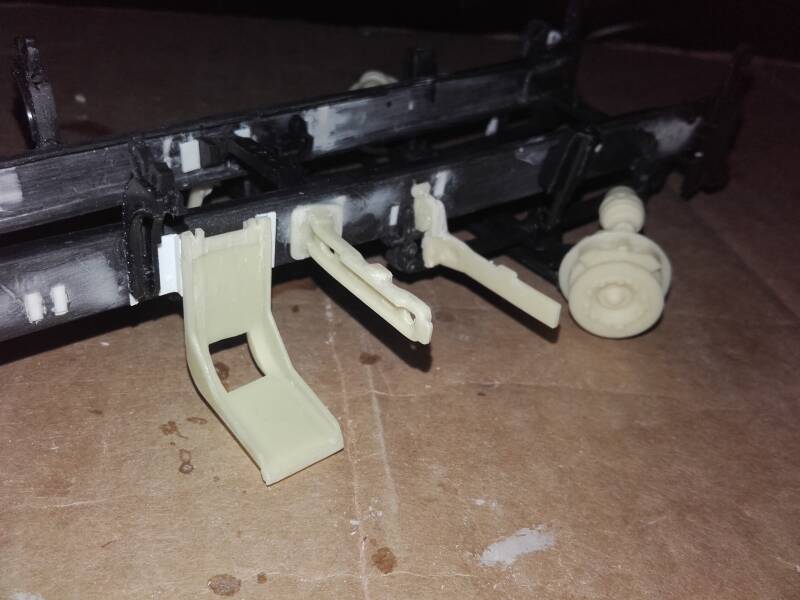
Van het voorste deel van het chassis heb ik de vooras en cabine steunen van Italeri verwijderd, daarna vervangen door metalen, die ik van het chassis gehaald heb dat ik voor de R2 Lowline gebruikt heb.
Ze horen bij de Resin Voorbumper / Voorspatborden set van MG Molding uit Engeland die ik ook bij de R2 Lowline gebruikt heb en nu dus voor dit project ga gebruiken.
Now, after Ten years on the shelf, the project was finally taken down in June 2025.
I cut the chassis in half and removed the CNC section because I didn't like it annymore. I replaced the CNC section with a KFS Resin rear chassis I had lying around, including the air suspension for both axles. This one fits better and looks much better now.
I sawed the airbags through the middle and enlarged the drive axle's airbags by 2mm and the trailing axle's airbags by 2mm.
This creates the nice effect of a lifted tag axle.
From the front of the chassis, I removed the Italeri front axle and the cab supports, then I replaced them with metal ones I salvaged from the chassis I used for the R2 Lowline.
These were included with the Resin Front Bumper/Front Fenders set from MG Molding in England, which I also used for the R2 Lowline and will now use for this project.


Bouw Proces Trekker; Deel 2
Building Proces Truck; Part 2
Hieronder vind je het verslag van het bouw proces tot 31 Oktober 2025 waarin je de vorderingen die ik tot op dat moment gemaakt heb kunt bekijken.
Below you'll find the report of the construction process up to October 31, 2025, where you can see the progress I've made up to that point.
3D Getekende Onderdelen Chassis
3D Drawn Parts Chassis
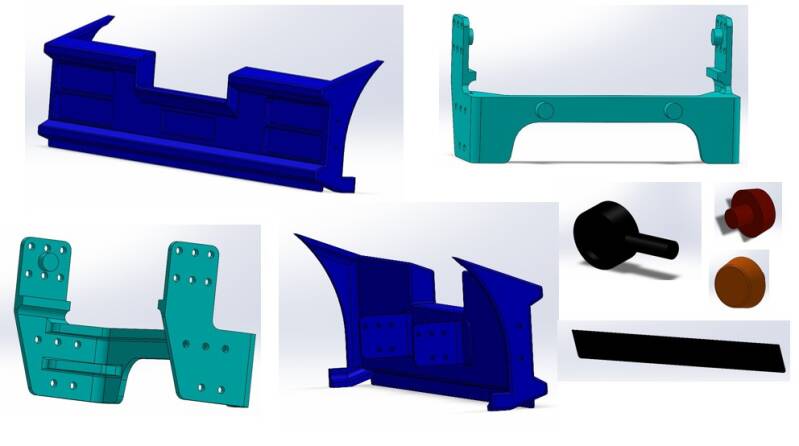
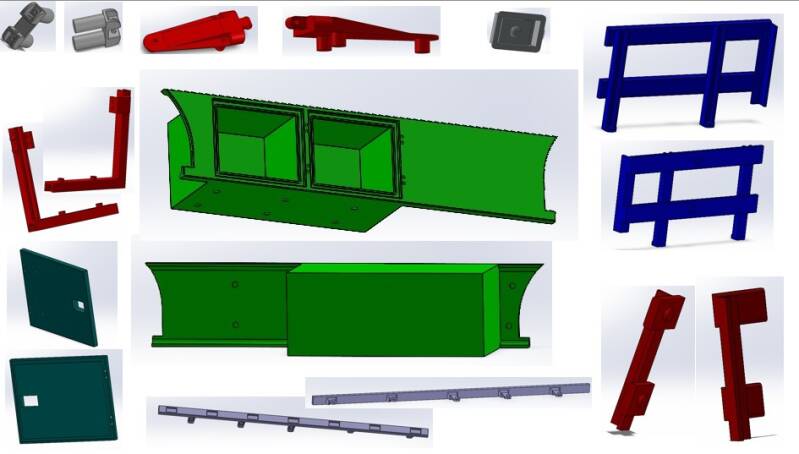
Nadat ik het Italeri chassis nieuw gebouwd heb ben ik begonnen met het tekenen van de 3D onderdelen voor dit project in het tekenprogramma SolidWorks.
Om de onderdelen te kunnen tekenen heb ik eerst (met behulp van een Italeri Chassis en het CNC gesneden Chassis van de Italeri MT Heavy Hauler) het chassis in SolidWorks uitgetekend met alle maatvoering zodat ik de juiste maten kon berekenen voor de onderdelen.
Ik ben begonnen met het uittekenen van de bestaande gaten die in het originele Italeri chassis zitten. Vervolgens heb ik de wielbasis bepaald.
Nadat ik die had vast gesteld ben ik begonnen om de montage gaten voor alle onderdelen uit te teken. Dit gaf mij de juiste afmetingen om de onderdelen te kunnen teken.
Het was een heel gedoe om dat allemaal uit te zoeken, maar het is gelukt.
Verder heb ik een bovenaanzicht getekend waar de maatvoering voor de breedte van de onderdelen opstaan.
After building the new Italeri chassis, I started drawing the 3D components for this project in the drawing program SolidWorks.
To draw the components, I first drew the chassis in SolidWorks (using an Italeri chassis and the CNC-cut chassis from the Italeri MT Heavy Hauler) with all the dimensions so I could calculate the correct dimensions for the components.
I started by drawing the existing holes in the original Italeri chassis. Then I determined the wheelbase.
After determining that, I started drawing the mounting holes for all the components. This gave me the correct dimensions for drawing the components.
t was quite a hassle figuring it all out, but I managed.
Furthermore I drew a top view showing the dimensions for the width of the components.


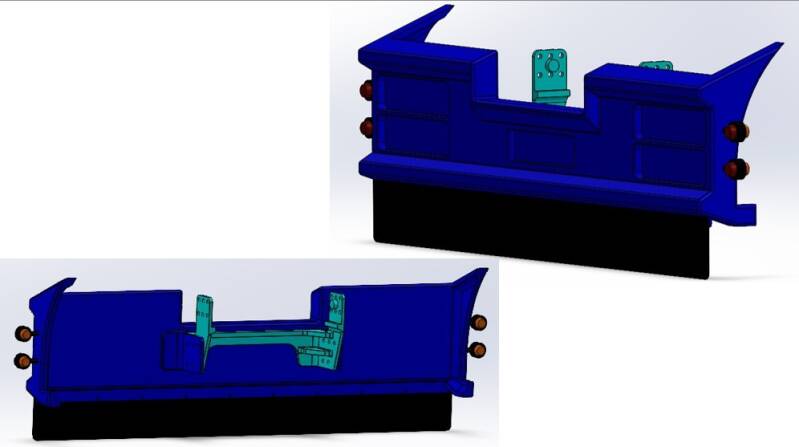
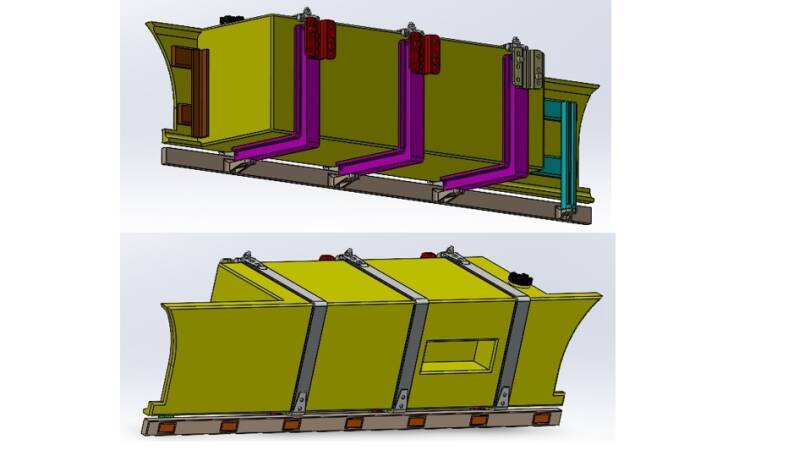
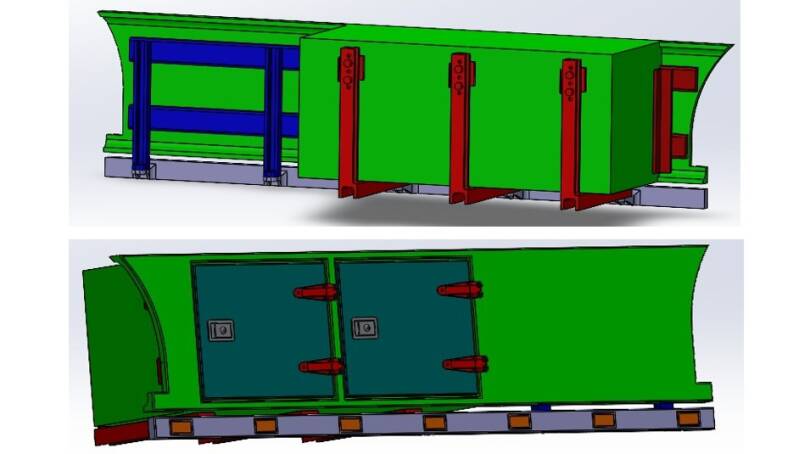
De onderdelen die ik getekend heb, hebben allemaal verschillende kleuren waardoor de onderdelen goed te onderscheiden zijn, hierdoor kun je ze in de “ASSEMBLY” goed onderscheiden.
Verder heb ik nog een "ASSEMBLY" gemaakt in de uiteindelijke eind kleuren.
Het Chassis en alle steunen en beugels worden ROOD, de Kist (incl. de Deuren), Sideskirts, Spatborden, Tank en Lichtbalken worden WIT met Tankbanden en Scharnieren (die nu grijs zijn) in het CHROOM.
The components I drew are all colored, making them easy to distinguish and allowing you to easily distinguish them in the "ASSEMBLY" section.
I also made an "ASSEMBLY" in the final colors.
The chassis and all supports and brackets will be RED. The box (including the doors), side skirts, fenders, tank, and light bars will be WHITE. The tankbands and doorhinges (which are gray) are will be CHROME.


Bouw Proces Trekker; Deel 3
Building Proces Truck; Part 3
Hieronder vind je het verslag van het bouw proces tot 28 November 2025 waarin je de vorderingen die ik tot op dat moment gemaakt heb kunt bekijken.
Below you'll find the report of the construction process up to November 28, 2025, where you can see the progress I've made up to that point.
Resin 3D Geprinte Onderdelen Chassis
Resin 3D Printed Parts Chassis
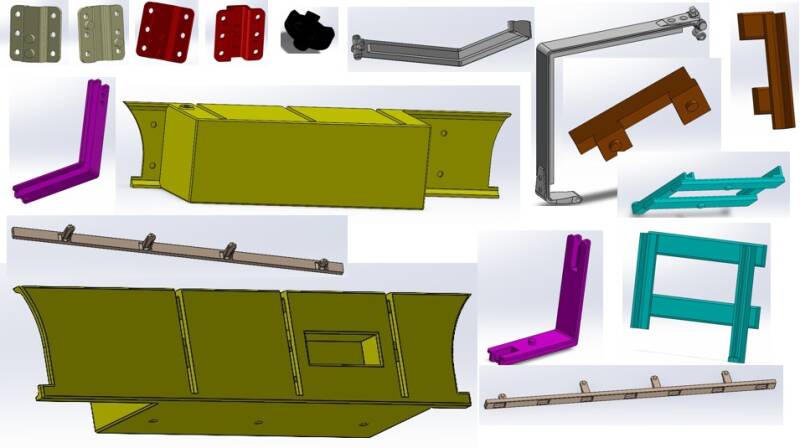
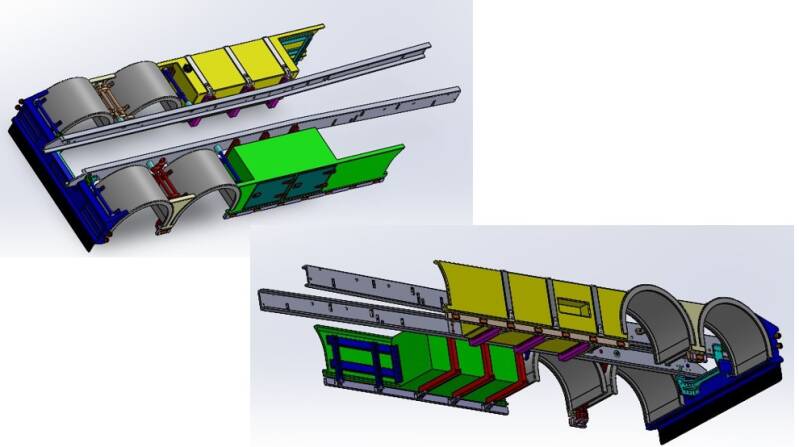
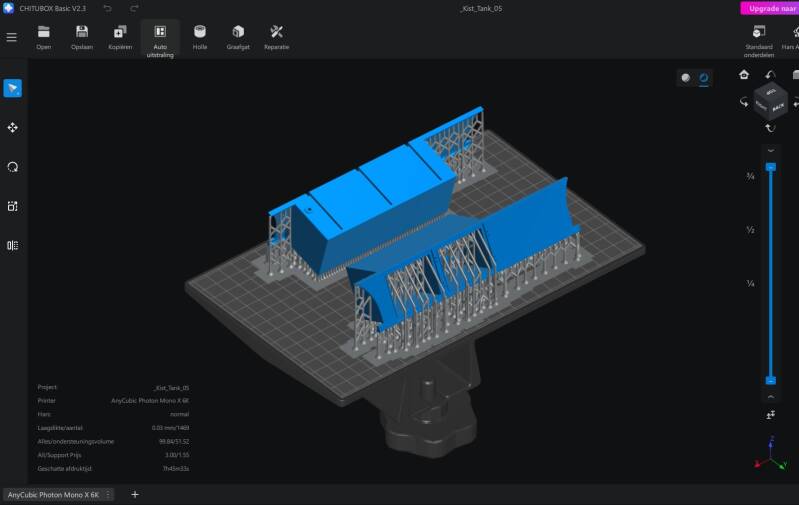
Daarna heb ik heb onderdelen via SolidWorks omgezet naar STL Files, waardoor je ze in dan een slider programma kunt laden.
Hiervoor gebruik ik zelf ChituBox waarin, waarin je ze om zet naar PWMB-files waardoor ze geprint kunnen worden.
Then I converted the parts to STL files using SolidWorks, which allows me to load them into a slider program.
For this, I use ChituBox, which converts them to PWMB files so they can be printed.


Maak jouw eigen website met JouwWeb